5 Simple Steps to Turn Your Home
into a Beautiful Photo Album
By Dan Davenport
OK... we all have LOTS of pictures.
In photo albums - in shoeboxes - on CDs - still in the camera.
Do your friends see all those great pictures?
Do they know what you and your family have done - what you're all about? Where you have been? Do they see what you and your family looked like in years past? Do they see what your parents and grandparents looked like? Do they see your friends? Does anyone actually take out your photo albums and look at the pictures?
In our house, the answer is definitely yes! But for many people, the answer is, unfortunately, no.
Why not change that? It takes just five easy steps to turn your home into a visual testament to your life.
1. Select the Photos You Want to Show These are the ones that really tell the story of your family. Two types of pictures that work best: show just people, or show people doing something. Sometimes a photo without a person (like a place you have been) will be good, but mostly, you want to see people. And for people pictures, up close is the best. You really get to see what they were like at that moment in their lives. For the photos of people doing something, though the people will be smaller, the location or activity tells the story.
2. Write/Create Captions This is best done when the photos are new and fresh because this is when you remember exactly what happened and why you took the photo. Could be as simple as "Wanda's Birthday Party," or more detailed with location and some of the back story. These captions are less important today, but years down the road, they will help bring back memories, and remind you of forgotten names (see if your grown children can identify their classmates in their third grade class picture). Captions can be visible within or below the frame, or can be put on the back of the framed photo should someone be curious. The visible caption can be the kind of fun statement placed in an interesting shape that you would put in a scrapbook, though these generally are short and sometimes not too informative. Or they can be more in depth - which lends itself to mounting to the back of the framed photo.
3. Print and frame Here is where your creativity really comes in. When printing, you can crop the photo to get rid of unnecessary and distracting elements and print to just the size you need for the area where the picture will be shown. The result will then feature your subject and what they are doing. Framing and matting should complement your décor and the photograph. It can be modern or traditional, but it should not distract from or overpower the photo, but enhance it. Remember, the people and the picture are what is important.
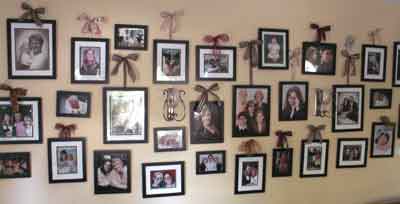
4. Display with pride This is your family and your life. And as photos change over the months and years, it becomes a moving visual history of you and your family. One of the easiest ways to work out the layout of the pictures is to lay them out on the floor. You can then move them around to create the pleasing arrangement that suits you. You can also cut out pieces of Kraft paper the same size as your pictures and temporarily tape them to the wall and rearrange them to get the most pleasing appearance. (The photo above of the wall over our living room couch shows ones possible display - consistent black frames with interesting ribbons holding most of the photos - and note the sconces in the middle of the wall. When you are entertaining friends, they add a nice touch and bring attention to the photos.)
5. Rotate photos over the months and years - bring new photos in. But when you take old pics out, put them in scrapbooks with captions intact. In the years to come, you and your family will be very glad you put the time and effort into documenting these pictures. Also change frames. It helps bring variety to your interior design, keeping your home always looking fresh and up to date... new photos and frames are easier than new paint and new furniture.
The most important point I can make here is to really do it. Get those photos out of hiding and get them up for you, your family, and your friends to see and enjoy. And, of course, as you learn more about taking better photographs, people will look at your pictures with admiration and awe.
© 2009 Dan Davenport

Here are several great resources I have partnered with to help you create exicting photo displays in your home:
First, do you have a Warhol-worthy pic? You'll find it a snap to turn it into a funky work of art at PhotoPopArt.com. Ordering is easy: you'll work with an internationally-renown pop artist. Upload your favorite photo and get three design previews. The selected design is then printed onto a gallery wrapped canvas and shipped, ready-to-hang. And if you need extra support, you can chat online or receive a quick turnaround customer consultation.


And talk about unique.... our partner Cafe Press has for years been one of the great places to proudly display your pictures and ideas on tee shirts, mugs, calendars - all sorts of stuff. Check it out!!!

Dan Davenport has been involved in photography for more years than he cares to think about. He worked for Minolta Cameras for over 30 years and taught photography as well as developing the Minolta School of Photography which evolved into The Maxxum Experience photo education seminars. He wants photographers to take the best photos they can and encourages them to proudly display their work for all to see.

|